

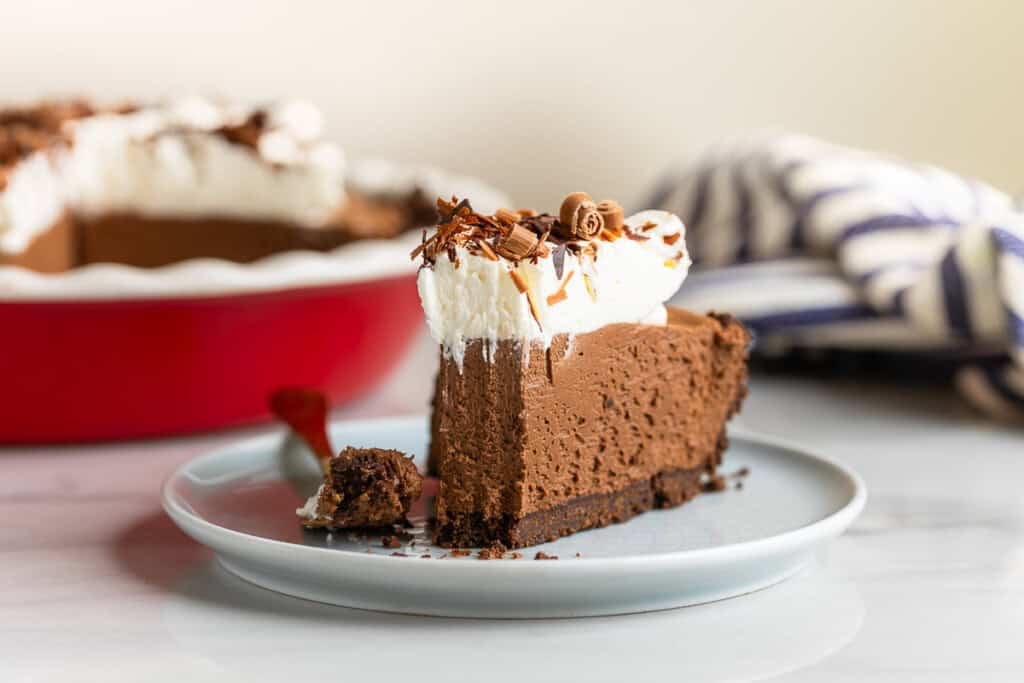
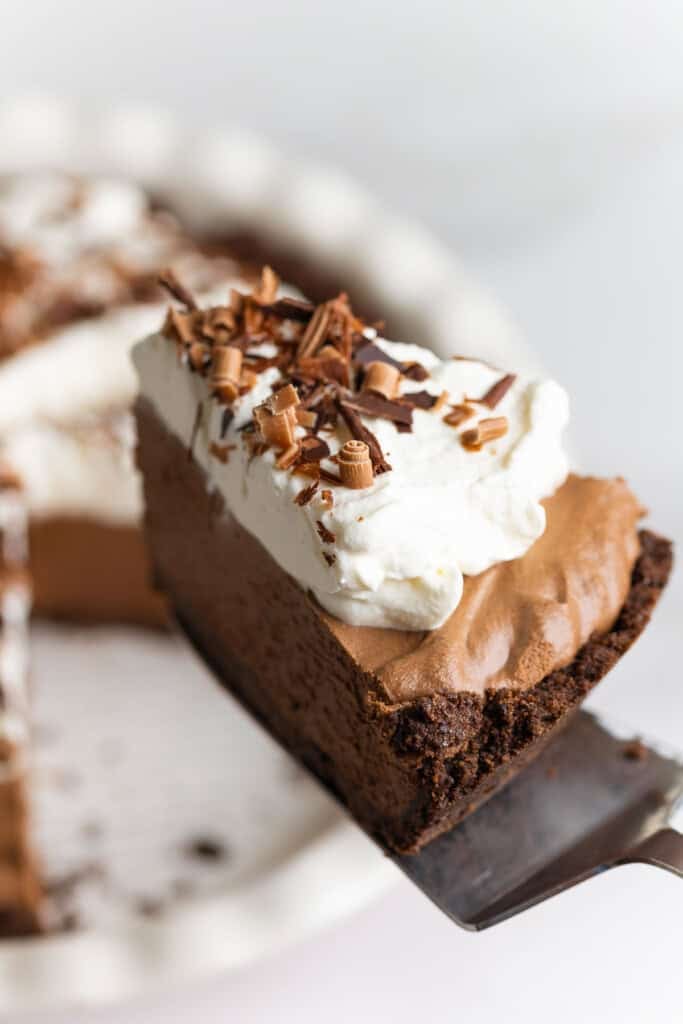
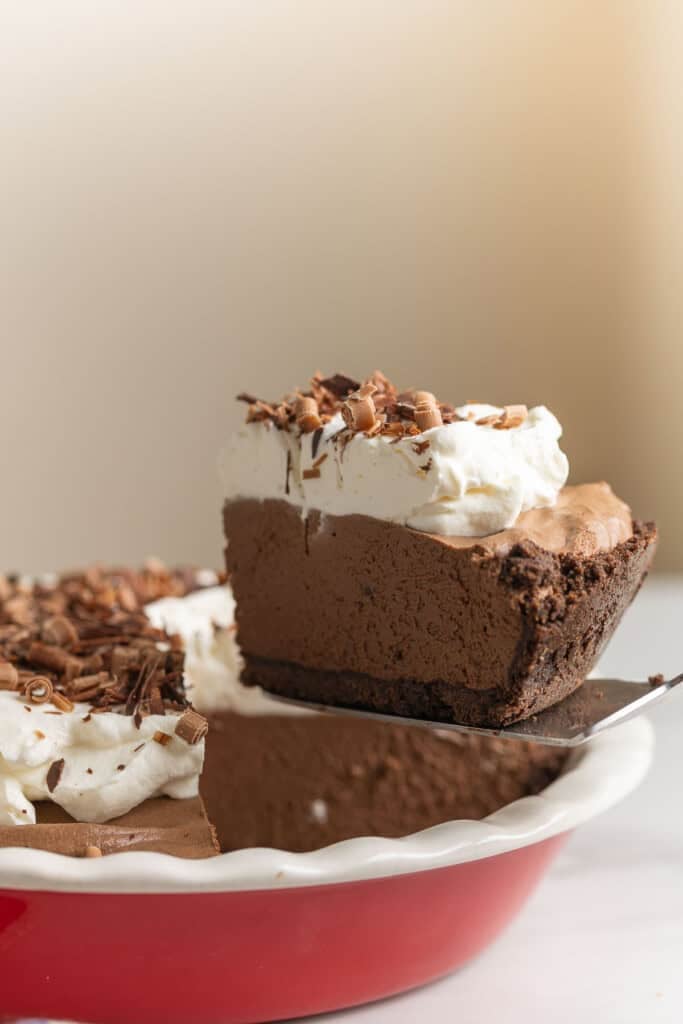
This gluten free French Silk Pie has a rich & silky chocolate mousse-like filling and an easy to make chocolate cookie crust. Serve this to your friends and family and they’ll never suspect it’s gluten free!
Gluten Free French Silk Pie at A Glance
- The silky chocolate filling
- True to it’s name, the creamy chocolate filling in French silk pie is super smooth and silky. You’ll need a stand mixer or an electric mixer to help your whip up the ingredients to create the light and airy texture.
- Gluten Free Chocolate Oreo Cookie Crust
- It’s super easy to make and made with only 2-ingredients: gluten free oreos & melted butter!
- FYI – You can make this with a flaky gluten free pie crust instead. Check the recipe notes for pie crust bake time and tips.
- It’s super easy to make and made with only 2-ingredients: gluten free oreos & melted butter!
- Factor in the chill time – make ahead:
- Make sure to allow time for the pie to chill in the fridge before serving so the pie filling has time to set before slicing and serving. This pie keeps well in the fridge making it a great make-ahead dessert to prep early.
- You will need to dirty a few bowls.
- French Silk Pie is not difficult, but it is messy and it can feel more complicated than it actually is because of how many steps & bowls you need. Most of the ingredients need to be thoroughly whipped individually and at different stages in order to end up with the signature light & airy texture. Make peace with the mess – it’s worth it!
How to Make The Gluten-Free Chocolate Silk Pie
The pie making process breaks down into 3 main stages:
- the chocolate cookie crust
- the creamy chocolate filling
- the whipped cream topping
↳What’s the difference between a gluten free French silk pie and a traditional French silk pie?
The crust! Both the chocolate filling and whipped cream topping are naturally gluten free, so once you sort out the crust there’s no need to alter anything.
With that being said, I’m lightly adapting Tessa’s recipe from Handle the Heat. Our ingredient amounts are slightly different as are the order of operations, but other than that I see no reason to change what works!
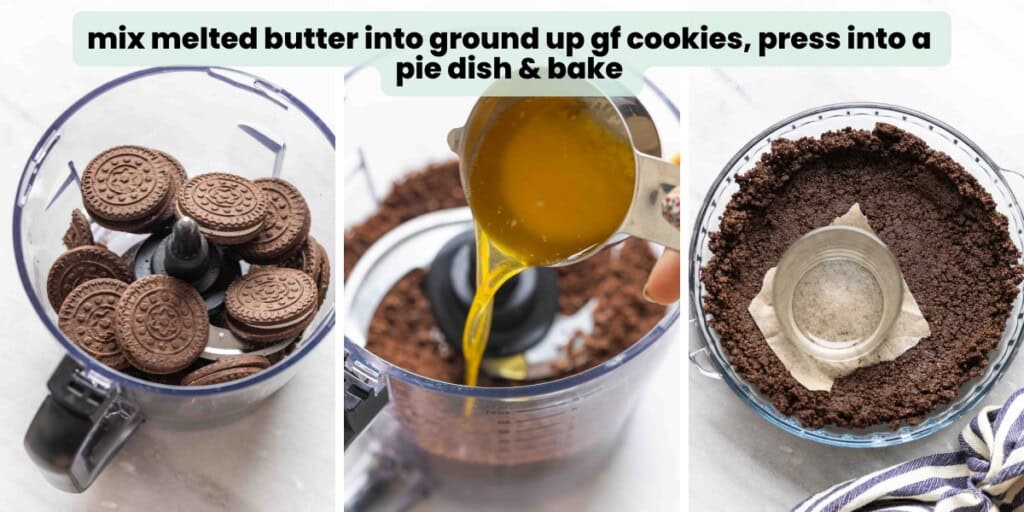
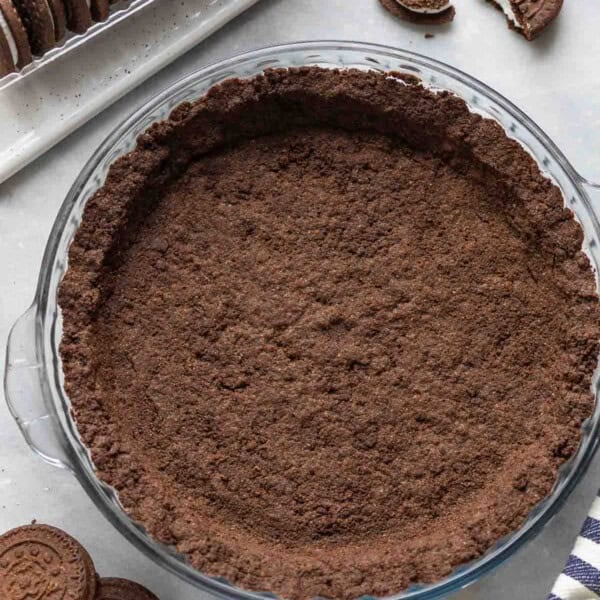
Make the Chocolate Crust
1. Make cookie crumbs. Blend/pulse whole gluten free oreo cookies (with the filling) into fine, grainy crumbs.
2. Add butter. Pour melted butter into the blender or food processor and blend in short bursts until you have a loose, moist looking mixture. It will look sandy, but clump together easily.
3. Press & bake. Tip the sandy crumbs into a 9-inch pie dish and firmly press the crumbs into the bottom & sides of the pan then bake at 350°F (180°C) for 10 minutes. After baking, set aside and let cool fully while you prep the filling.
- Tip! Use a flat-bottomed cup to press/smooth the crust into the plate. If the crust sticks too easily to the cup, place a piece of parchment paper between the crumbs & cup to keep things moving smoothly.
Make the Chocolate Filling
1. Melt chocolate. Melt chopped chocolate in a microwave (in 20-second intervals, stirring between each interval) or in a doubler boiler on the stove. After melting, set the bowl aside to cool down a bit.
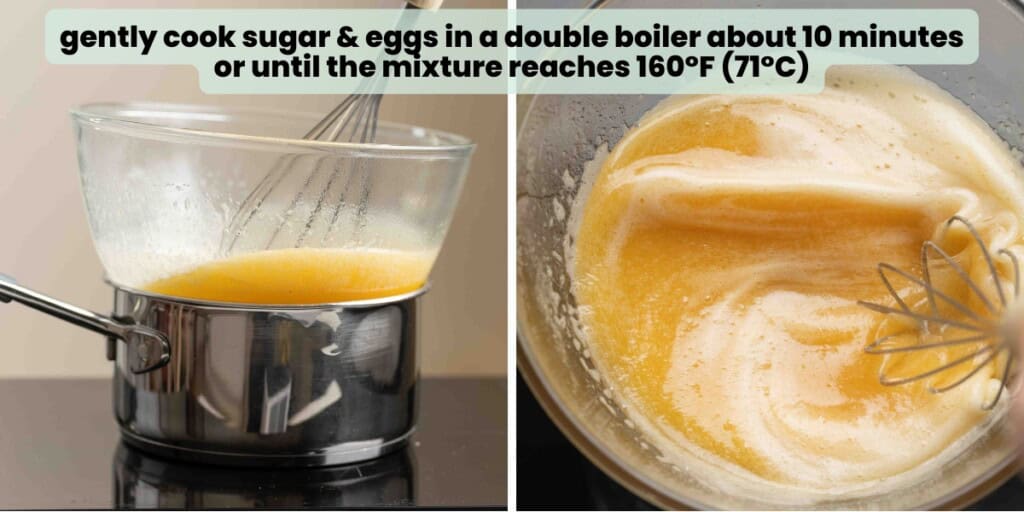
2. Gently cook eggs & sugar to make a custard. Whisk together the eggs & sugar in a double-boiler or heat-safe mixing bowl then place over the top of a small or medium saucepan filled with 1-2 inches of simmering water. Whisk constantly and cook, about 10 minutes or so until the temperature reads 160°F (71°C) to cook the eggs. Slow and steady heat with frequent stirring is the key. Once done, take the pot off the heat source.
- Tip! Choose a bowl the fits comfortably on top of a small or medium saucepan without tipping or dipping too low inside the pot.
How to Know if the Eggs Are Cooked without a Thermometer?
General food safety guidlines indicate that you need to cook eggs to 160°F (71°C) to make eliminate bacteria like salmonella. The best way to ensure you reach this temp is with a food thermometer, but if you don’t have one you can look for visual cues.
Your egg mixture should be totally smooth and bit glossy with no sugar grains remaining. If you dip a metal spoon into the mixture the custard should easily coat the back of the spoon. Run a finger over the spoon – if the line holds for a moment before it immediately fills up it’s done.
3. Add melted chocolate. Pour the cooled chocolate and vanilla extract into the egg + sugar mixture and whisk into a thick and glossy mixture. The chocolate doesn’t need to be fully cooled, but you don’t want it so hot that it scrambles the eggs.

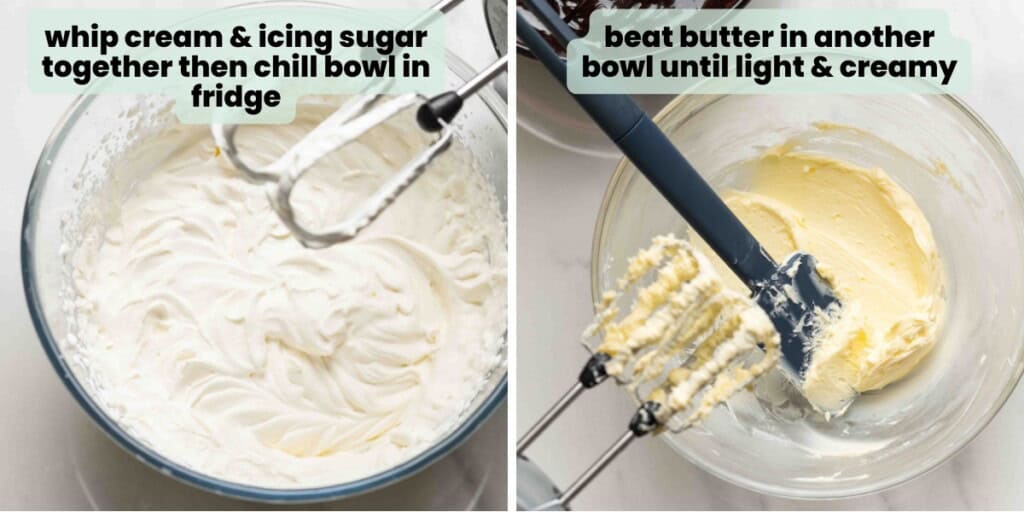
4. Whip cream. Whip cold cream and icing sugar in a mixing bowl until stiff peaks form then place the bowl in the fridge to keep cold.
5. Beat butter. In a medium mixing bowl, beat the softened butter for a few minutes until the’s light and creamy.
6. Add chocolate. Pour the chocolate into the beaten butter. Mix slowly (so it doesn’t splatter) at first to combine then increase the speed and beat on medium-high a couple minutes until you end up with a thick and creamy chocolate mixture.

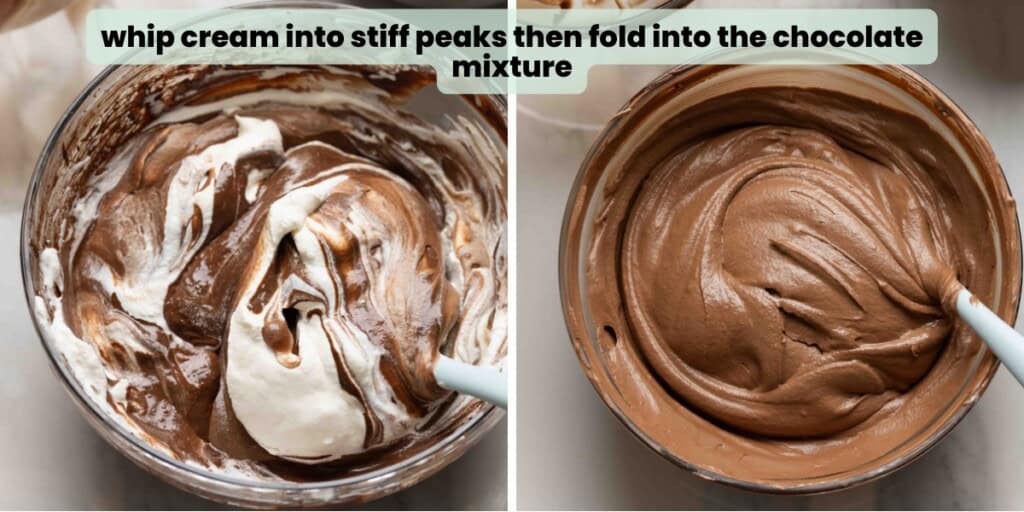
7. Fold in whipped cream. Add the chilled whipped cream into the chocolate bowl and gently fold together with a spatula until fully combined. Make sure to scrape the the sides and bottom of the bowl. In the end you should have a thick, mousse-like chocolate mixture.
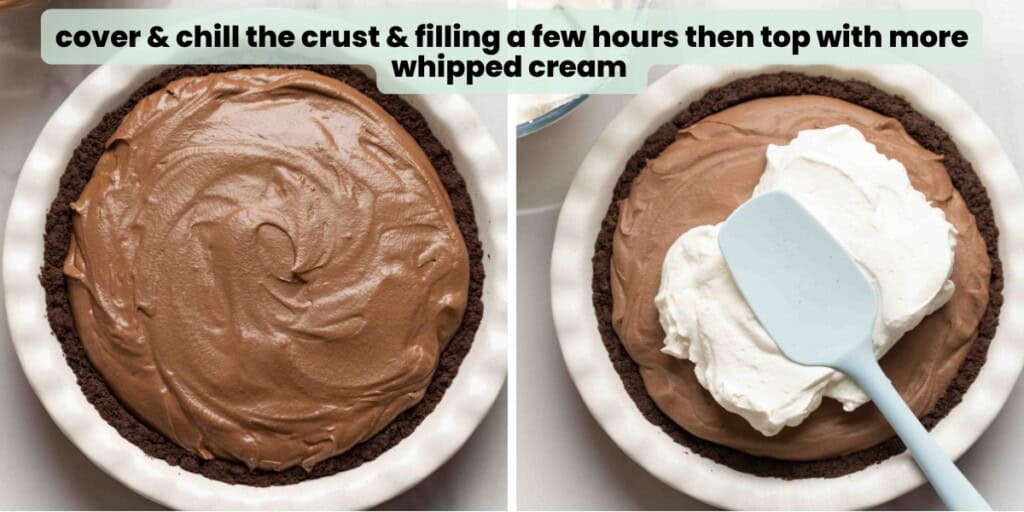
8. Add filling & chill. Pour the fluffy chocolate filling into the cooled pie crust and evenly smooth over the bottom. Cover tightly with plastic wrap and place in the fridge to chill at least 4 hours to set & thicken or up to 2 days.
- FYI: Don’t worry if the plastic wrap touches the top of the filling. Once you add the whipped cream you won’t see any smudges.
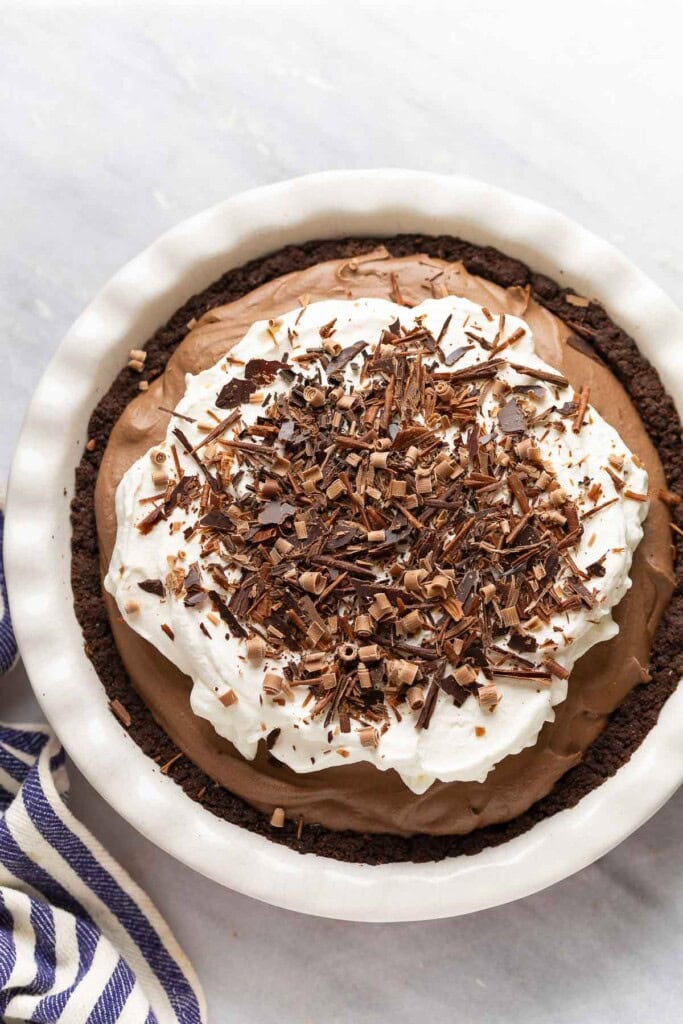
9. Whip cream topping. After chilling the filling, beat heavy cream/whipping cream on a medium-high speed for a few minutes until light and fluffy (not quite at the stiff-peak stage). Spread over the top of the pie and smooth over the top. Leave a gap about an inch or so from the crust to show off the the chocolate layer underneath. Sprinkle chocolate shavings or a dusting of cocoa powder over the top if you want and serve right away or chill in the fridge a few hours before serving.

French Silk Pie Tips & Things to Know
- Firmly press the cookie crumbs. The tighter your press the cookie crumbs into the pie dish before baking, the more sturdy your crust will be. Loosely packed crumbs will make a crumbly crust.
- Use a flaky pie crust instead. Feel free to swap out the oreo crust here for a flaky pie crust instead. Use your favorite homemade or store bought crust. If you want to use my gluten-free pie crust recipe, you’ll only need half the pie dough. Freeze the remaining half for another day.
- FYI: par-bake the crust first at 375°F (190°C) for about 15 minutes or follow the directions for par-baking with your preferred pie crust. I also recommend you par-bake with pie weights (or dried beans) so the crust doesn’t shrink.
- Make Ahead: You can prepare French Silk Pie without the whipped cream topping up to 5 days before serving. Wait to add the whipped cream until just before or a few hours before serving for freshness. It’s also much easier to keep in the fridge without the cream topping.
- Freeze: Freeze the crust & filling up the 3 months. Wrap the pie in the pie dish a few times to ensure it’s airtight. Defrost in the fridge overnight then add the whipped cream after defrosting.
More Gluten Free Desserts to Impress Family & Friends With
Enjoy!
Let me know if you try this Gluten Free French Silk Pie recipe! Leave a comment and review with your thoughts. I always appreciate the feedback and serving suggestions that you come up with!

Gluten Free French Silk Pie Recipe
Light, silky and super rich - this gluten free French silk pie looks and taste like a dream! It makes a great make-ahead dessert to share during holidays, birthdays & special occasions.
Ingredients
Crust
- 2 cups oreo cookie crumbs (250g) - 14 cookies, but amounts will vary based on brand - see notes
- 4 tbsp butter, melted (56g)
Filling
- 6oz bittersweet baking chocolate or dark chocolate, chopped (170g)
- 4 large eggs
- 1 cup granulated white sugar (200g)
- ½ cup unsalted butter, room temperature (112g)
- 1 tsp vanilla extract
- 1 cup cold heavy cream [whipping cream in the UK] (240ml)
- 1 tbsp powdered sugar (8g)
Topping
- 1 cup cold heavy cream [whipping cream in the UK] (240ml)
- 1 tbsp powdered sugar (8g)
- cocoa powder or chocolate shavings for topping - optional
Instructions
Crust
- Preheat oven to 350°F (180°C).
- Add whole cookies to a food processor or blender. Pulse the cookies until you grind them up into a fine crumb. Add the melted butter to the blend and pulse again in 5-second bursts until evenly combined and the cookies crumbs are moist. The mixture should look sandy and loose, but you should be able to clump it together.
- Add the cookie crumbs into an un-greased 9-inch pie dish. Firmly press the cookies crumb into the bottom and sides of the pan. Use a spoon or the bottom of a flat cup to make it even.
- Bake the crust for 10 minutes then set aside to fully cool before adding the filling.
Filling & Topping
- Melt Chocolate: Melt in a heatproof bowl in the microwave in 20-second increments (stirring in between each increment) or in a heatproof bowl set over a saucepan of gently simmering water. Make sure the bottom of the bowl doesn’t touch the water. Stir occasionally until fully melted then set aside to cool to room temp. After melting, aside.
- Eggs & Sugar: Add the eggs and sugar to a small sauce pan. Whisk together then place the pan over a medium-low heat for about 10 minutes. Keep watch over the pan, whisking constantly until it reaches 160°F/71°C (thick enough to coat the back of a spoon).
- Chocolate & Vanilla: Remove the pan from the heat, then stir in the melted chocolate and vanilla extract. Set aside to cool down to room temperature.
- Whip Cream: In a large mixing bowl with electric beaters or in the bowl of a stand mixer with the whisk attachment, beat the cream and powdered sugar together on a medium-high speed for 4-5 minutes until stiff peaks form. Place in the fridge to keep chilled until step 7.
- Beat Butter: In a medium bowl with hand mixers or in a stand mixer with the paddle attachment, beat the butter on a medium-high speed 1-2 minutes until creamy. Scrape down the bottom and sides of the bowl.
- Add Chocolate Mixture: Gradually add the cooled chocolate mixture to the butter. Do this with the blender running on a low-speed or add small bits at a time, blending in between each addition until fully combined. Beat another 3-4 minutes on a medium-high speed until light and fluffy.
- Add Whipped Cream: Add the chilled whipped cream to the chocolate mixture and gently fold until fully combined.
- Fill Crust & Chill: Pour the chocolate filling into the prepared pie crust and smooth evenly over the top. Cover tightly with plastic wrap and place in the fridge to chill for at least 4 hours or up to 2 days before serving.
- Whipped Topping: In a stand mixer bowl with the whisk attachment or a large bowl with a hand mixer, beat together the whipped cream, vanilla and powdered sugar on a medium-high speed for 3-4 minutes until fluffy, almost stiff peaks form. Spread the whipped cream over the chocolate filling. Top with a dusting of cocoa powder or chocolate shavings if desired and serve ASAP or chilled a few hours in the fridge (uncovered).
Notes
- Store and refrigerate up to 5 days. Freeze the pie without the whipped cream topping up to 3 months. Thaw overnight in the fridge then add fresh whipped cream before serving.
- Oreos/Cookie Crumbs: Not all cookie brands are the same. Ultimately you need 250g of cookies OR 2 cups packed crumbs. If you don't have a kitchen scale, you may want to measure your cookie crumbs before you add the butter to ensure you have the right amount.


Leave a Review!